
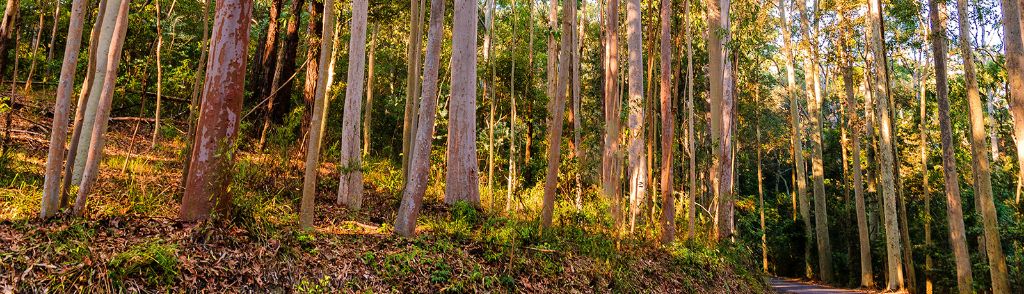


Results for competitions in Comp 3 Open and Set – Nature
There were 13 entries that were rated the highest by our judge(s).
Members can view all images and comment on them by following this link
View / Comment entries in Comp 3 Open and Set – Nature
click here to see a pdf catalog of all competition results
|
Come a Littel Bit Closer Chris Kenyon – Set – Top Shot Set Subject Colour Large Print 
|
Thirsty Norm Wilkinson – Set – Top Shot Set Subject Mono Large Print 
|
|
Splender in the Snow Larry Armstrong – Set – Top Shot Set Subject Small Print 
|
Female Satin Bower Bird Don Dickins – Set – Top Shot Set Subject Digital 
|
|
Sunrise web Elaine Holliday – Set – Merit Set Subject Colour Large Print 
|
on watch Elaine Holliday – Set – Merit Set Subject Colour Large Print 
|
|
Lorrikeet Norm Wilkinson – Set – Merit Set Subject Colour Large Print 
|
Kookaburra Norm Wilkinson – Set – Merit Set Subject Colour Large Print 
|
|
Emu on the alert Elaine Holliday – Set – Merit Set Subject Mono Large Print 
|
Springbok Prasad de Silva – Set – Merit Set Subject Small Print 
|
|
Rainbow lorikeet Richard McMullen – Set – Merit Set Subject Small Print 
|
Down and Out Nancy Morley – Set – Merit Set Subject Digital 
|
|
Siblings Ruth Penman – Set – Merit Set Subject Digital 
|
by Don Dickins, 15 April 2024
Adrian Whear Presentation available on line.
Dear Members,
Adrian kindly allowed us to record last night’s presentation. Please click on the link below if you wish to watch again or if you were unable to see this last night. The link will be valid for 30 days.
Adrian was very generous with his time and knowledge and I’ve received a lot of great feedback from members saying that they were inspired by his talk.
https://us06web.zoom.us/rec/share/8b7O8x6Nr97Tygf_tSS1fbGEPIV3OL-5nSwyowTSePy8DFtSCSowSfX6YuK9a9ME.oJtyDZAkIdPs0Jkc
Passcode: u26g^dSG
kind regards
Elaine
by Chris Kenyon, 14 April 2024
Competitions in Comp 3 Open and Set – Nature are closing soon!
Competitions in Comp 3 Open and Set – Nature will close Saturday, 13th April 2024, 11:55 PM.
Entries can be made in the following areas:
- Set Subject Small Print
- Set Subject Colour Large Print
- Set Subject Mono Large Print
- Set Subject Digital
- Open Small Print
- Open Colour Print
- Open Mono Large Print
- Open Digital
All members are encouraged to enter.
Don’t Forget next Wednesday 10th April
Zoom Presentation by Adrian Whear hosted by Hornsby Heights.
Elain will send you an email with the zoom log in details, so watch your emails.
Details will not come from the Pennant Hills site or email
by Chris Kenyon, 7 April 2024
Understanding Black Point from Picture Correct
| Greetings fellow photographer, What is the color black? It seems like that should be a relatively easy question to answer. However, it’s not – especially when it comes to black and white photography. |
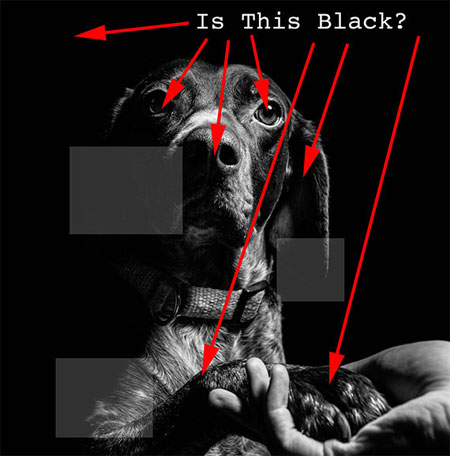 |
| There are infinite shades of color and tone all around us. Our brain, through the help of our eyes, categorizes and identifies each object that we view. We look at an object and say, “Oh, that’s black.” The truth is that there are infinite shades and tones of the color black. The cute picture of the dog illustrates this idea. What’s black in that picture? Are all of those points at the tip of the red arrows the color black? Yes, they are, and that brings up a critical concept in black and white photography. This concept is known as the Black Point. If you take a moment and look at the three gray boxes in the puppy photo, you’ll see that there are areas of the dog’s ear, face, and leg that have disappeared into the background. They have quite literally melted away. This can mean that the Black Point was not appropriately placed, and in this case, I would say that was true. |
 |
| In this second example photo, the woman’s head, neck, and shoulders disappear into the background. The difference is that in this case, it was intentional for effect. Knowing how to place your Black Point is a valuable skill in photography (particularly for black and white photography)! Let’s Define Black Point The Black Point is the darkest and most dense black area of your photograph. On a histogram, it’s located to the very far left of the scale. When you read that area with an RGB eyedropper, it reads 0,0,0. The below photograph is a superb example of a well-placed Black Point. This woman is literally covered in black. Yet notice how you can see detail and texture in her blouse, hair, on the camera, and even under the hat. Where is the Black Point in this picture? |
 |
| A well-placed Black Point is typically located in a non-significant shadow area within the frame. Here’s Today’s Quick Tip: Black Point is vital to your photography, especially black and white photography, as it helps to ensure that you have a full range of tone within your picture! You place the Black Point by carefully watching the histogram as you convert a digital color file to a black and white photograph. Once you’ve made the conversion, you can further fine tune the Black Point with the Adjustment Brush and/or the Lightroom sliders labeled Shadows and Blacks. For further training, you may want to study a few examples from this popular eBook on mastering B&W Photography which just went on sale today. Until next time, try converting one of your photos to black and white and placing the black point in the best spot. Sent with 💌 from PictureCorrect |
by Chris Kenyon, 7 April 2024
ASIA PACIFIC AWARDS 2024
Mieke Boynton recently posted on Facebook about the amazing images in the Asia Pacific Awards for 2024. With my curiosity sparked I couldn’t help but go into the site and have a look.
Unbelievable, stunning, jaw-dropping!!!!!
If you would like some pure magical inspiration, then visiting the Asia Pacific Awards Website is well worth your while. https://asiapacificphotoawards.com/
Once on the home page, scroll across and click on the Winners Gallery Tab. This will give you a drop down menu that will give you access to all categories and also past years.
You will see some familiar names such as Peter Eastway, Matt Palmer, Mieke Boynton, Robin Moon and Nilmina de Silva (I presume the same Nilmina from Hornsby Heights club). I am sure you may recognise some more names.
Hope you enjoy and hopefully get some inspiration and ideas.
by Janne Ramsay, 4 April 2024
THE MONO AWARDS 2024
The Mono Awards are now open (25th March) and close on the 5th May 2024. Now in its 6th Year the awards are open to photographers from around the world.
As well as acknowledgement, winners, runners-up and People’s choice share in a prize pool of $18,000 dollars. Price per entry is $30.
Here is the link if you are interested and would like more information or just want to read a few informative articles on black and white photography – https://www.themonoawards.com.au/
by Janne Ramsay, 2 April 2024
APS Australian Cup 2024 -Update
On behalf of the committee I would like to acknowledge the club members for the many amazing images that were uploaded for consideration in the APS Australian Cup 2024.
I am excited about the quality of the images and the commitment shown by the members of our club.
The selection of the final 20 images to be entered into the competition is going to be quite a task for our selection team. In the meantime many of the images will also be considered for the FCC Interclub later in the year.
The photographs will be chosen over the next month and I will let you know early in May if we will be entering some of your images in the Australian Cup 2024.
Once again a massive thank you…
Regards
Janne
by Janne Ramsay, 2 April 2024
Hints from Graeme James
For some years I have been using Aaaron Dowling’s plugins ADP LumiFlow and MonoFX. While at the time I had to pay for them I see he is now offering them for free! They are worth looking at, especially if you are into zone masking. I use MonoFX as a major component in post-processing all my B&W images and the Zone heat map for colour images in ADP LumiFlow is a wonderful visual aid and well-worth having a look.
 The Times Are A Changin’ The Times Are A Changin’With some time to slow down a little, I’ve taken that time to reflect and ponder where I’m going from here. Although the business side of photography saw me travel around the world on tours, do many presentations and create digital products, and make great friends, I’ve decided that it’s time to wrap that part of my journey up. Instead, I’m going to focus my energy back into what made me fall in love with photography to begin with. It’s the personal exploration, the excitement that made you reach for your camera, the anticipation of what’s around the corner. These things drove me into the field and made me happier then just about anything else, next to my beautiful wife of course. What does this mean for you?  Plugins The ADP LumiFlow and MonoFX Plugins are now free for everyone at the links above. Plugins The ADP LumiFlow and MonoFX Plugins are now free for everyone at the links above.I’ll be loading the supporting video content onto YouTube, bare with me as I make these available. The plugins are currently available on my Aaron Dowling Photography website at the links above. At this stage we won’t be completing any updates or upgrades to our plugins. They are still compatible with all Windows computers and Pre M1 Mac’s, and work in Rosetta mode in M1 & newer Mac’s. Video Workshops Our video workshops will be available for free, including: Photoshop For Beginners The Art of Black & White Editing Luminosity Masks Unmasked Please bare with me as I make these available through our YouTube channel. We will also make the images that go with the workshops available for free. My Photoshop for Beginners Workshop has already been released, find more details below. “My passion for photography and sharing is still strong. With that I hope to continue to create post processing tutorials well into the future.”  How Can You Support Us & Ensure We Keep Creating Free Content? Subscribe, Watch, Comment, Share & Like Our YouTube Videos How Can You Support Us & Ensure We Keep Creating Free Content? Subscribe, Watch, Comment, Share & Like Our YouTube VideosJump onto our YouTube Channel and hit the subscribe button at the top of our channel or in the bottom right corner of any of our videos. If you enjoy the YouTube videos, let us know by liking, commenting or sharing the videos. Every Little Bit Helps!  Free Photoshop For Beginners My Phtoshop For Beginners Workshop is the first to be made available for free. The entire workshop is available on YouTube, and the images are available on my website at the links below. Free Photoshop For Beginners My Phtoshop For Beginners Workshop is the first to be made available for free. The entire workshop is available on YouTube, and the images are available on my website at the links below. Watch the full Photoshop For Beginners Video Workshop here. Download all the images for the workshop here. Below are the 5 Full Image Edits that are available in the Photoshop for Beginners Workshop, all free to watch now.  Perth Sunset: Turn a flat RAW file into a vibrant and rich landscape image. Perth Sunset: Turn a flat RAW file into a vibrant and rich landscape image.  Bali Markets: Convert portraits to Black & White and direct attention to the main subject. Bali Markets: Convert portraits to Black & White and direct attention to the main subject.  Temple Sunset Part 1 & Part 2: Blend 3 images without using luminosity masks. Temple Sunset Part 1 & Part 2: Blend 3 images without using luminosity masks.  Bali Fish Markets Part 1 & Part 2: Make your travel images sing. Bali Fish Markets Part 1 & Part 2: Make your travel images sing.  Cascades Part 1 & Part 2: Create a serene and stunning landscape. Aaron Dowling Photography Cascades Part 1 & Part 2: Create a serene and stunning landscape. Aaron Dowling Photographyaarondowling@aarondowlingphotography.com Unsubscribe here |
by Chris Kenyon, 28 March 2024
HDR Photography from Picture Correct
| Greetings fellow photographer, Today I am writing to share some insightful tips on High Dynamic Range (HDR) photography, a technique that can significantly enhance your photographic prowess. Here is an exposure Before the HDR technique has been applied: |
 |
| HDR photography allows the capture of more detail in both the shadows and highlights of an image, extending beyond the capabilities of a single exposure. The technique requires taking multiple exposures of the same scene and combining them in post-processing. Here’s a simple step-by-step guide: 1. Choose the Right Scene: HDR isn’t necessary or suitable for every scene. It’s best applied to scenes with high contrast, with both very dark and very bright areas. Typical examples are landscapes contrasting a bright sky with a dark ground, or interior shots that juxtapose bright windows with dark corners. 2. Setup: Use a tripod to mount your camera. This is a crucial step as you’ll be taking multiple images of the same scene with varied exposure settings. Any movement between shots could disrupt the desired effect. 3. Camera Settings: To maintain a consistent depth of field, set your camera to Aperture Priority mode and reduce noise by setting your ISO to the lowest level. 4. Bracketing: Bracketing involves taking multiple photos of the same scene, each with a different exposure setting. Typically, three photos are taken: one with normal exposure, one underexposed, and one overexposed. Some cameras have an auto bracketing function (AEB) that makes this task easier. If your camera lacks this feature, you’ll need to manually adjust the exposure compensation or shutter speed between shots. |
 |
| 5. Taking the Photos: Utilize a remote shutter release or your camera’s self-timer function to minimize camera shake and potential image blurring. Ensure you have at least three photos: underexposed, correctly exposed, and overexposed. |
 |
| 6. Post-Processing: Merge your images into one HDR image using software like Luminar Neo or Photomatix. These applications align your images, merge them, and apply tone-mapping to create the final HDR image. You can then further adjust the image to your liking, working on the shadows, highlights, contrast, and other parameters. Here is the result: |
 |
| Remember, HDR photography is an artistic tool, not a mandate. Not every photo requires it, and using it indiscriminately can result in unnatural-looking photos. It’s essential to use it judiciously to achieve the best results. Try it while it’s on sale: HDR Photo Editing in Luminar Neo Keep an eye out for those scenes with deep shadows and bright highlights. Sent with 💌 from PictureCorrect |
by Chris Kenyon, 23 March 2024